I Tested And Reviewed 10 Best Glue For Peel And Stick Tiles (2023)
Choosing the right glue for peel and stick tiles is crucial for a long-lasting and beautiful installation. With so many options on the market, it can be tricky knowing where to start. Here are a few key factors to consider before making your purchase.
First, assess the surface you'll be applying the tiles to. Is it a high-moisture area like a bathroom or kitchen? If so, look for a waterproof adhesive. For floors, you'll need an adhesive strong enough to withstand foot traffic without letting tiles lift. Pay attention to dry time as well—you don't want guests tracking through a sticky mess!
Next, consider indoor vs. outdoor use. Outdoors calls for a durable, weather-resistant adhesive. Indoors, you may opt for quicker grab and release for easier positioning. Removability is another consideration if you ever plan to change up your design.
Not sure where to start? Here are a few questions to ask yourself: Will you be installing over existing tile? Does the surface need extensive prep work? How quickly do you need the project completed? Do you want permanent adhesion or easier removal later on? Thinking through these factors will help narrow your search.
Choosing the best glue for your peel and stick tile project doesn't have to be complicated. With some upfront planning and research, you can select the perfect adhesive for a stylish, long-lasting installation you'll love.
10 Best Glue For Peel And Stick Tiles
| # | Product Image | Product Name | Product Notes | Check Price |
|---|---|---|---|---|
|
1
|
 |
The product is ideal for DIY flooring projects in kitchens, dining rooms, bedrooms, and bathrooms.
|
|
|
|
2
|
 |
The product is ideal for easy and affordable DIY flooring in kitchens, dining rooms, bedrooms, basements, and bathrooms.
|
|
|
|
3
|
 |
The product is ideal for easy, self-adhesive installation of a stone-like design on walls.
|
|
|
|
4
|
 |
The product is ideal for adding an attractive and easy-to-install backsplash to kitchen, bathroom, vanity, tabletop, or fireplace areas.
|
|
|
|
5
|
 |
The product is ideal for adding a stylish and waterproof backsplash to kitchens, showers, and bathrooms.
|
|
|
|
6
|
 |
The product is ideal for creating a stylish and easy-to-install backsplash in kitchens or bathrooms.
|
|
|
|
7
|
 |
The product is ideal for enhancing interior spaces with a durable and stylish backsplash.
|
|
|
|
8
|
 |
The product is ideal for adding a realistic wood plank look to any room easily.
|
|
|
|
9
|
 |
The product is ideal for adding a stone beige peel and stick backsplash to kitchens, bathrooms, fireplaces, and laundry rooms.
|
|
|
|
10
|
 |
The product is ideal for quickly and easily updating the look of floors in any room.
|
|
1. Quick-Install Vinyl Tiles – Modernize Any Room!


I purchased 2 boxes of the oak colored parquet from Achim in August 2019 to use on my basement stairs. I accidentally mixed them up with my Traffic Master vinyl tiles, which had the same pattern but were slightly darker. Despite this, the Achim tiles blended well due to the lighting on the stairs. The problem now is that my spare Traffic Master tiles, which I had kept for my kitchen floor, were used on the stairs with the Achim tiles. This means I can no longer replace the damaged tiles as needed, as the Traffic Master tiles have been discontinued for years.
The Traffic Master tiles were 1.8mm thick, slightly thicker than the 1.2mm Achim tiles. However, the pattern, finish, and texture of the two brands are almost identical, with the Achim tiles being a bit shinier. I personally like the shinier finish. On April 18, 2020, I ordered 8 more boxes of Achim tiles for my kitchen floor, and I recently ordered an additional box as a backup in case any tiles need replacing. I love the color, texture, and price of these tiles, and even though Achim states a 5-year warranty, I believe they will last much longer if properly cleaned and installed.
When I first purchased the Achim tiles in August 2019, they cost $16.00 per box of 20 tiles (12-inch by 12-inch squares). However, a few days ago, on April 13th, the price dropped to $13 per box. This price drop is an added bonus to my overall satisfaction with the tiles. I am extremely happy with the quality, color, and price of these tiles. The price works out to be around 87 cents per square foot, which is significantly cheaper than the prices at Home Depot and Menards, where tiles are running at around $2.30 per square foot.
My husband found the Achim tiles easy to work with when he applied them to my stairs, as well as the Traffic Master tiles. He mentioned that both brands were great to work with, despite the fact that they were not meant to be used together. I am excited to receive my latest order and hope that all the tiles are from the same dye lot. I plan to reach out to the company to confirm this or check when the order arrives in 3 days.
2. Achim Vinyl Wood Tiles – Easy Diy Flooring!


I recently purchased this peel and stick tile for my kitchen floor and I must say, it exceeded my expectations. Despite being incredibly cheap, the tile has held up remarkably well over the past two years. The colors perfectly matched my blue countertops, making it a seamless addition to my kitchen.
While the ordering process was a bit frustrating, with delays and missing boxes, the end result was worth it. The finished product may not be professionally installed, and there were some minor issues with aligning the pattern, but considering the price and the overall look, it was a perfect fit for my home.
I have received numerous compliments from family and friends who have noticed the tile and inquired about it. It truly is a hidden gem of a purchase and one of the best I've made on Amazon. The durability of the tile is impressive, as I haven't had to replace any pieces yet.
In addition to my kitchen, I also used these stick-on tiles for my bathroom floor as a temporary solution. They were incredibly easy to apply and even easier to reapply if I made a mistake. The tiles adhered well and cutting them to size was a breeze. The only downside is that the white color makes my dark hair stand out more, but that's a personal preference and not a fault of the product.
For under $25 and a few hours of work, I am extremely impressed and satisfied with this peel and stick tile. While it may not be a long-term solution, it has served its purpose well and given me a better idea of what I want for future renovations. Overall, I highly recommend this product for its affordable price, easy installation, and durability.
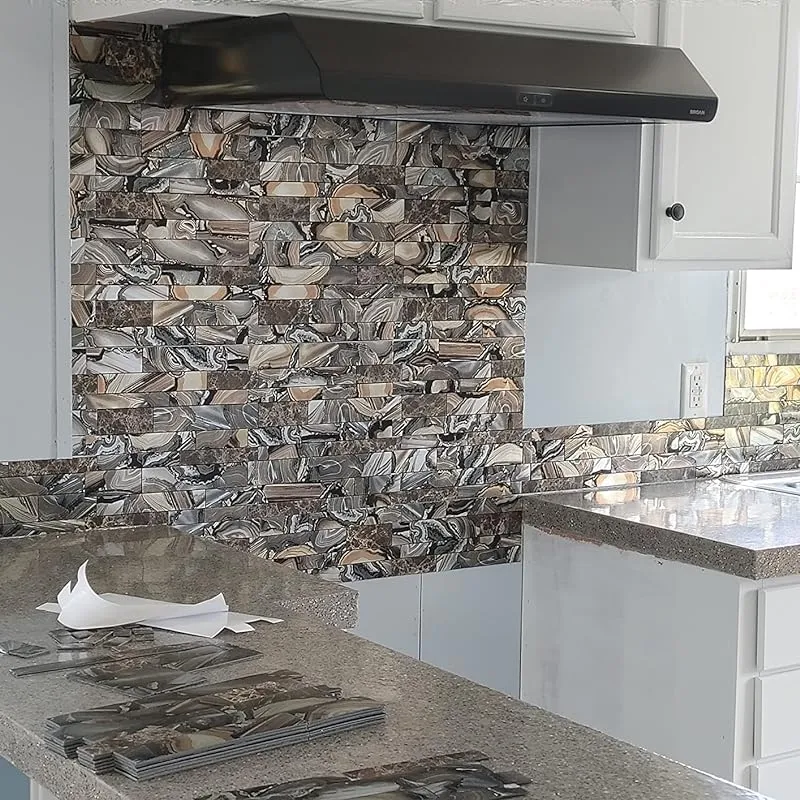
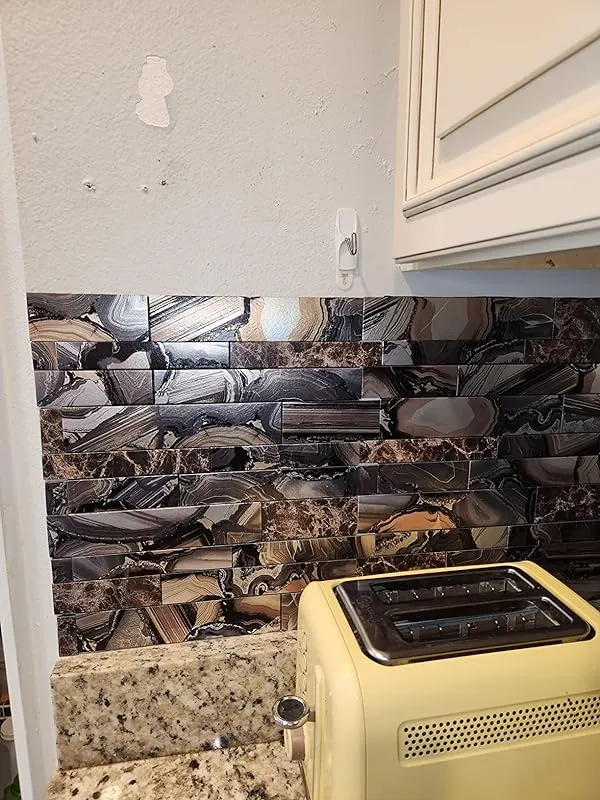
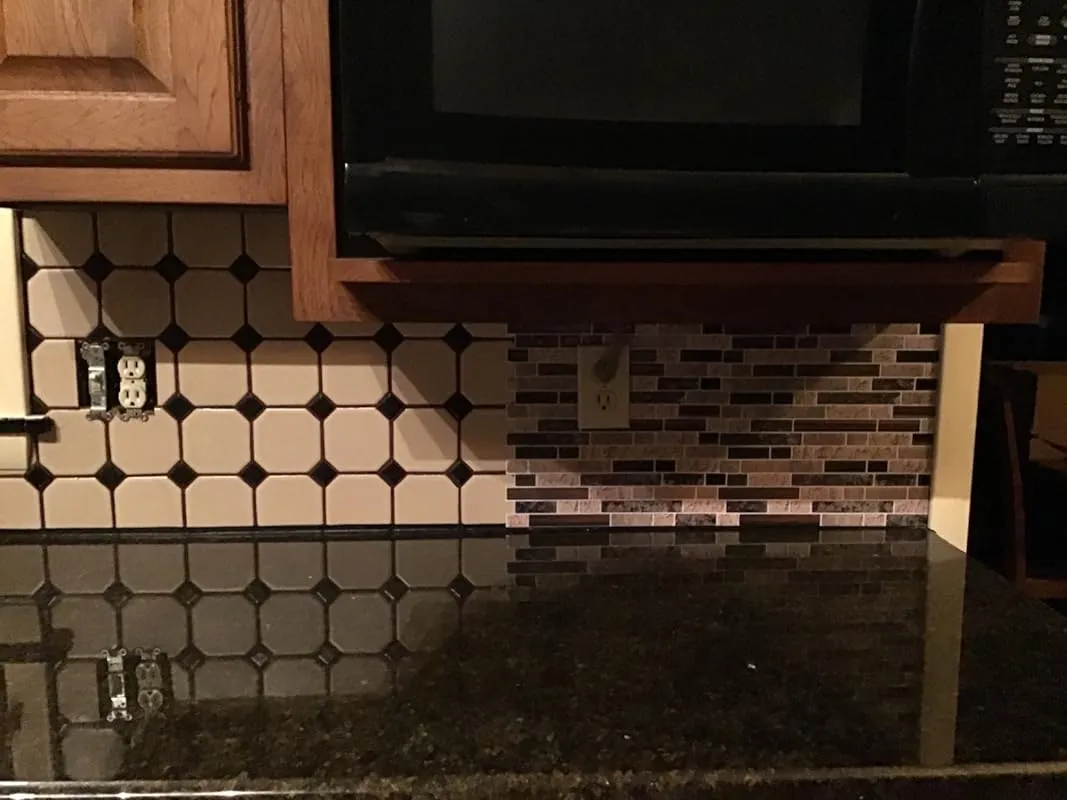
3. Brick Stone Backsplash: Art3d Self-Adhesive Wall Tiles (Brown)
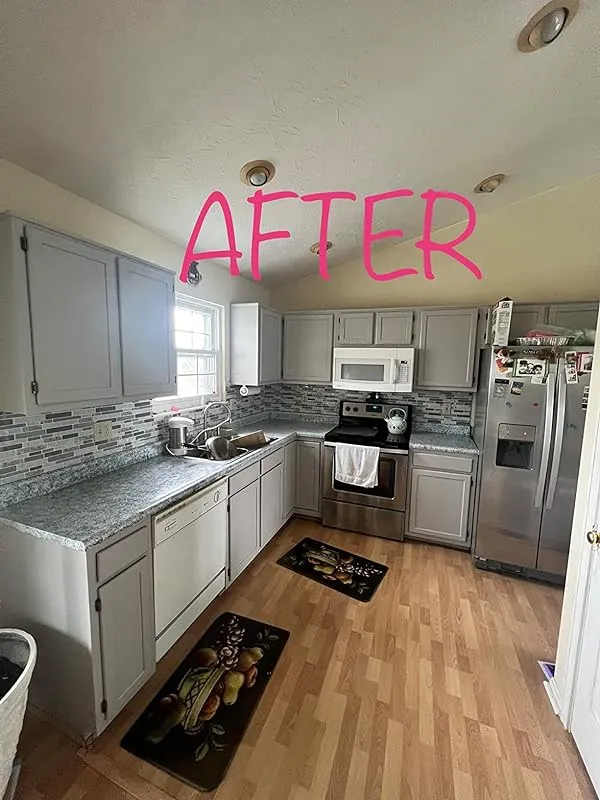


I recently purchased and installed these stickers for my kitchen backsplash, and I couldn't be happier with the results. Before making my purchase, I took the time to measure the area and read through numerous reviews to ensure I was making the right choice.
I have light gloss paint in my kitchen, so I lightly sanded the area and thoroughly cleaned it with alcohol. I also customized some of the stickers to fit around corners, and did a test hang with scotch tape while the clear film was still on the wallpaper. The stickers matched the edges perfectly and fit like a glove! I was able to complete the installation within 2 hours, all by myself, without needing any extra help. My perfectionist husband checked in on me from time to time, and we were both amazed at how realistic and high-quality the finished result looked. Our guests have been fooled into thinking it's real tile, and they're always amazed when we tell them it's actually wallpaper. It's been almost a month since the installation, and there has been no peeling. The stickers are easy to clean and still look great.
As a contractor, I've done many backsplashes before, and tiling is one of my favorite tasks. However, for this particular project, I needed a quick and cost-effective solution since it was for a rental property. This material exceeded my expectations in terms of speed and affordability. I had purchased additional adhesive based on some reviews, but I found the adhesive backing provided with the stickers to be more than sufficient. I suspect that the negative reviews regarding the adhesive may be a result of inadequate surface preparation rather than a flaw in the product itself.
In terms of cutting the stickers, I initially tried using a guillotine paper trimmer as recommended by someone else, but it didn't work well for me (despite mine being fairly new). Instead, I purchased utility shears from Home Depot, and they worked perfectly. The material itself is not difficult to cut, but using weak or dull scissors may result in jagged edges.
4. Kieacia Green Onyx Peel & Stick Kitchen Backsplash
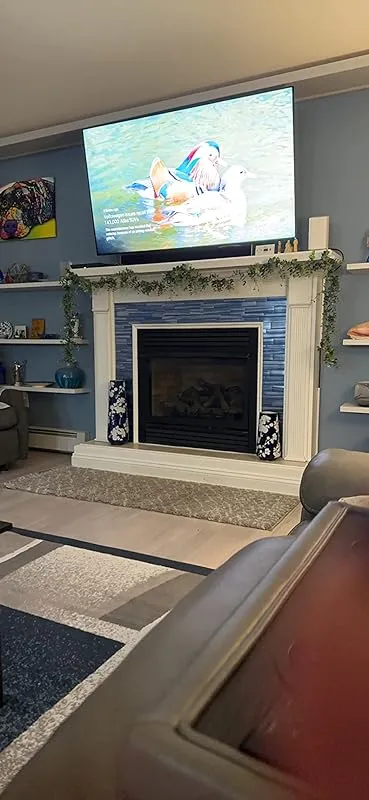


I am absolutely blown away by the design of these peel and stick tiles. The intricate tile design completely transformed the look of my kitchen when I installed it as a backsplash. The installation process was a breeze, and cleaning it is a piece of cake. However, I must warn you that once these tiles are on the wall, they are extremely difficult to remove. So, I highly recommend measuring twice before installing each piece to ensure a perfect fit.
The quality of these peel and stick tiles is outstanding. The adhesive is strong and reliable, ensuring that the tiles stay in place without any issues. The thickness of the tiles adds to their durability and gives them a high-end appearance. I am very pleased with my purchase and would definitely buy them again for any future projects.
We were able to complete our fireplace project in just about an hour using these tiles. They were incredibly easy to cut to the desired size and the installation process was a breeze. Most importantly, the end result was absolutely stunning. The tiles added a touch of elegance to our fireplace and we couldn't be happier with how it turned out.
5. Xfasten Teal Peel & Stick Kitchen Backsplash Tiles
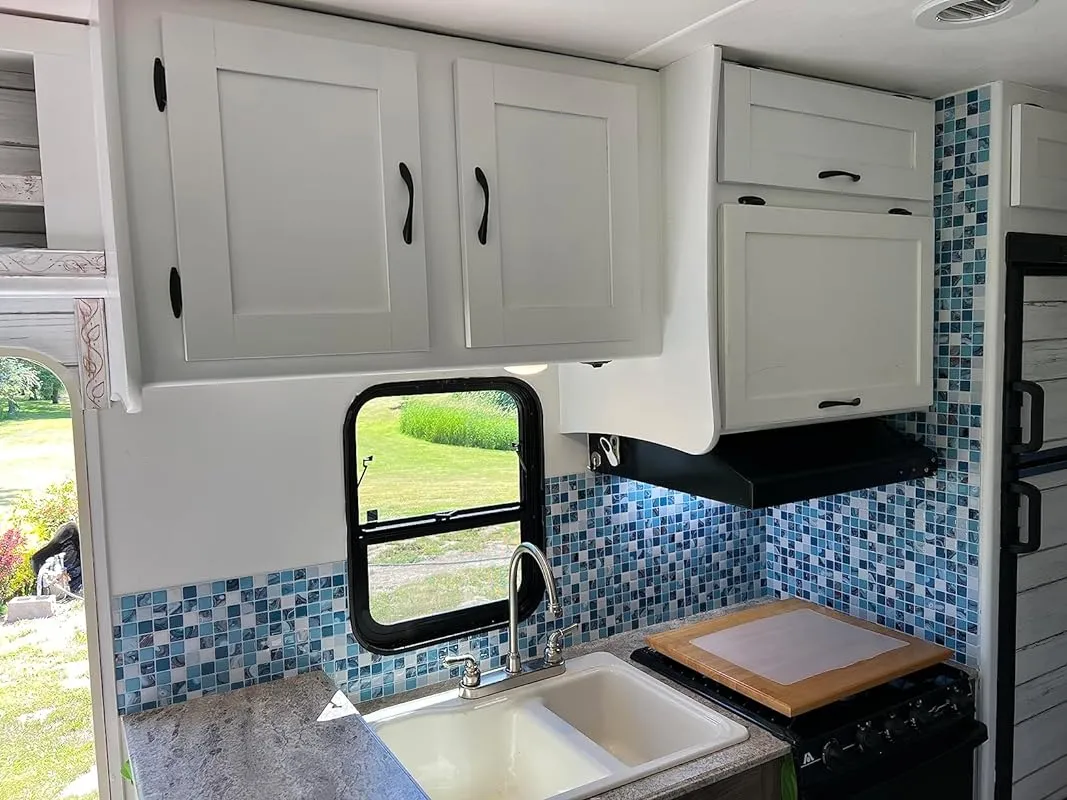


I recently used the XFasten Peel and Stick backsplash to remodel my RV kitchen, and I must say, it exceeded my expectations. After trying out three other manufacturers' products that turned out to be flimsy and easily torn, I was relieved to find that this product was the complete opposite. The foam backing and 3D texture provided great sturdiness, making it easier to align, match, and cut. I was able to use both a utility knife and scissors without any issues.
One minor drawback I found was the limited variety of colors available. If there were more options, I would definitely consider using this backsplash in my home as well. Despite this, I highly recommend the XFasten Peel and Stick backsplash for any remodeling project.
In another scenario, I had a shower installed, but the door ended up being higher than the stall walls, which made it look sloppy. Additionally, the project was already over budget with the hired "handyman." That's when I came across the XFasten Peel and Stick backsplash and decided to give it a try. I was pleasantly surprised by how easy it was to use and cut. The package even included a small knife, making the installation process even more convenient. Using a ruler and cutting board, I was able to achieve a perfect fit. I couldn't be happier with the end result.
The attention to detail and quality of the XFasten Peel and Stick backsplash is evident in its packaging. Unlike many other products, it comes in a sturdy box, making it easy to store any unused pieces. The included cutting blade was also of impressive quality, making clean cuts without requiring excessive pressure.
I particularly appreciate the foam padding on the tiles, as it adds depth and ensures the product adheres nicely to slightly textured walls. Although I didn't encounter many difficulties while working with this backsplash kit, cutting down the pieces to size posed a challenge. Blending the horizontal edges of each adjacent piece was a bit difficult, as cutting right down the middle of the grout lines proved tricky. Additionally, the adhesive is exceptionally strong, which is great for longevity but requires steady hands during the application process.
6. Waldecoo Premium Beige Peel & Stick Subway Tile


I recently used this product during my bathroom remodeling project and I must say, it exceeded my expectations. The adhesive on these sheets is incredibly strong, ensuring that they stick well without the need for additional caulk. Although I initially had some difficulty applying them, I quickly realized that the stickiness was actually a benefit as it ensured a secure and long-lasting installation.
Once I got the hang of removing the backing, the installation process became much easier. However, I do think it would be helpful if there was a slight pull-down tab to make it even more convenient. These sheets are particularly suitable for flat and even surfaces, but I did encounter some challenges when trying to install them in corners and narrow spaces due to the overlapping.
The texture and feel of the sheets are quite nice, and they adhere well to surfaces. I was highly satisfied with the end result and would definitely recommend this product to others. It arrived quickly and in perfect condition, making the installation process even more pleasant. The sheets looked great on my textured wall and provided a seamless finish.
Additionally, I also used this product in my kitchen to enhance the appearance of my black backsplash. The peel and stick sheets did a fantastic job of making the kitchen look prettier and brighter. While the installation was somewhat easy, I would suggest purchasing a few extra sheets to account for any pattern adjustments that may be needed.
7. Stickgoo Thicker Design Peel And Stick Tile Backsplash In Sandstone(1 Sheet)


I recently had the opportunity to try out the STICKGOO 10-Sheet Anti-Mold Peel and Stick Wall Tile, Self-Adhesive Kitchen Backsplash in Sandstone (Thicker Design), and I must say, I am thoroughly impressed.
First and foremost, the tiles are incredibly realistic in appearance. They mimic the look of real glass tiles, but without the hassle of a long and difficult installation process. As someone who has used real glass tiles for backsplashes in the past, I can attest to the fact that the installation can be messy and time-consuming. With the STICKGOO tiles, however, the process was a breeze.
The self-adhesive feature of these tiles is a game-changer. All I had to do was mark the walls with a level line, clean them thoroughly, and then stick the tiles onto the wall. It was that simple. The finished look is absolutely beautiful, and I couldn't be happier with the result.
I did come across a few tips that might be helpful for others considering these tiles. Firstly, since the weather was cold when I installed them, I warmed up the sheets of tile near my oven. I thought this might help them adhere better to the wall. Additionally, I used the backing sheet from one of the tile sheets as a template for cutting around electric outlets. This made the process much easier and ensured a clean finish. Just make sure to make the hole slightly smaller than the outlet so that the faceplate covers the edges of the tile.
It's also important to pay attention to the top grout line on the tile to ensure a consistent finished look. And don't forget to remove the clear protective film from all the tiles after pressing them onto the wall. If you don't have a roller, a smooth plastic glass or even just the palm of your hand can be used to press the tiles onto the wall.
I was also pleased with the customer service provided by STICKGOO. They were quick to respond and very helpful when I had an issue. It's always reassuring to know that a company stands behind their product and is there to assist if needed.
One thing to note is that the tiles do have a slight odor initially, similar to when you open a new vinyl or plastic shower curtain. However, this odor dissipates quickly after the tiles are installed, so it's not a major concern.
8. Achim Home Decor Vinyl Wood Planks – Easy Diy


I recently purchased the peel and stick plank flooring in a rich brown color for my bathroom. While it is obviously not high-end wood flooring, it still provides a nice look at a very affordable price. The installation process was quick and easy, as I was able to complete the entire box in just 10 minutes. The flooring does not look exactly like the photo, but it does resemble old rustic boards, which perfectly complements my rustic farmhouse-style home. The color coordinates well with my medium gray bathroom, white ruffled shower curtain, and natural wood accents. I initially considered purchasing the gray option, but due to the significant price difference, I decided to give the brown a try and I'm glad I did. Some reviewers mentioned that the flooring did not stick well, so I purchased dap glue as a precaution, but I did not end up needing it. If any additional maintenance is required over time, I will update my review.
As a realtor who has been in countless homes and rentals, I have a good understanding of quality. In terms of price, this peel and stick plank flooring is a total steal. Even without considering the price, the quality is still impressive. I have a couple of tips for installation: 1) If you need to go under the baseboard, lift it and slide the tiles under instead of removing it. 2) Start the installation about a plank away from the wall, rather than parallel to it. 3) Use color seal touch-up solutions to fill in gaps, as this will save you a lot of time and prevent the need for lifting and replacing the planks. Overall, I absolutely love this product and I spent hundreds for my tiny apartment because I was unaware of how it works, but it was worth every penny.
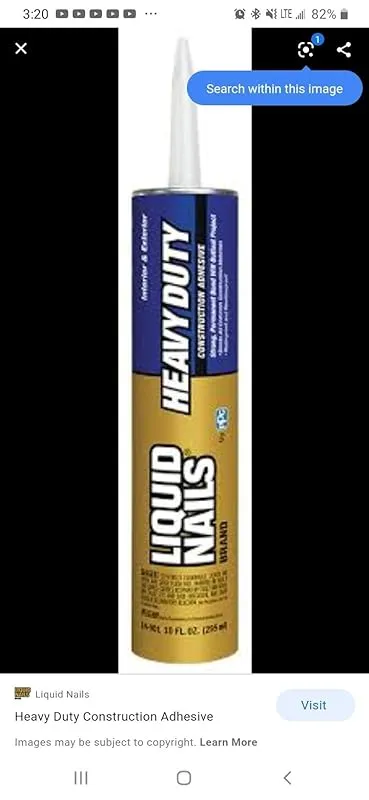
When I needed to change my kitchen cabinets on a budget, I came across this amazing peel and stick product. I used it to cover my ugly cabinets, some of which were painted with latex paint by previous owners and some were bare. I am extremely pleased with the result. The planks have a real wood-like texture and the color is just right, not too dark or too light. I would give this product 10 stars if I could, but the glue that comes with it is not very strong. To ensure a secure bond, I used all-purpose liquid nail glue and a spatula to apply it to each plank. Several months have passed and the planks are still in place. I used a total of four boxes, with 16 planks in each, and it took me three afternoons to complete the project. I spent $107 plus tax, which is significantly less than the cost of new cabinets. I recommend using a blade to cut the planks and bending them for easier cutting. However, I would not recommend this product for high traffic floor areas as it is quite thin.
9. Stone Beige Pvc Wall Tiles: Easy-Fix Backsplash Solution


I recently purchased these peel and stick tiles and I must say, I am thoroughly impressed with their quality. Unlike the usual peel and stick options, these tiles are heavy duty and made with a thicker material. While it did take a bit longer to apply due to the thickness, I believe it is a positive attribute as it ensures a more durable and long-lasting finish.
Using these tiles was a breeze and I found them to be surprisingly well made. The adhesive is strong, allowing for easy installation. Although I have not yet installed them, I can already tell that they will add a beautiful touch to my space.
Upon completion, I was extremely pleased with the final result. The tiles look great and have a pleasant tactile feel. They also appear to be quite resilient. However, I did encounter a minor issue with the paneling links and plastic spacers. Some tiles seemed to jut out slightly from the wall. To rectify this, my husband applied grout and used a stamper to create a more flush finish. The end result is amazing, and you would never guess that these tiles are peel and stick.
In terms of customization, I opted to apply a light coat of paint over the tiles, as I was unable to find the exact color I desired. However, the product itself performed fantastically.
10. Floorpops Parla Peel & Stick Floor Tiles, Black

I am extremely satisfied with this product. It worked incredibly well for my needs. However, I did notice that certain areas required a little more weight to keep them down perfectly. In hindsight, using the weight roller as suggested would have been a great idea.
I also found that the adhesion improved significantly over the first few days. This is something to keep in mind if you decide to give this product a try.
I must say, these adhesive tiles were exactly what I was looking for. I wasn't ready for a full remodel just yet, but I wanted to enhance the aesthetics of my space in the meantime. These tiles did the job perfectly.
If you decide to purchase this product, I highly recommend getting some extra glue for better adhesion. It will ensure that the tiles stay in place securely.
FAQs
Are there any potential issues or pitfalls to be aware of when using glue for peel and stick tiles?
When using glue for peel and stick tiles, there are a few potential issues or pitfalls that you should be aware of. Firstly, using glue may void the warranty of the peel and stick tiles, so it's important to check the manufacturer's guidelines before proceeding.
Additionally, if the glue is not applied evenly or in the correct amount, it can lead to an uneven or lumpy surface, affecting the overall appearance and performance of the tiles. Another consideration is that the glue may make it more difficult to remove or replace the tiles in the future, as it can leave residue or damage the subfloor.
Lastly, using glue may require more time and effort during installation compared to the traditional peel and stick method. If you're considering using glue, I would suggest testing it on a small area or consulting with a professional to ensure compatibility and avoid any potential issues.
Are there any specific instructions for applying glue to peel and stick tiles?
Yes, there are specific instructions for applying glue to peel and stick tiles. While peel and stick tiles are designed to be self-adhesive, there may be instances where additional glue is required for better adhesion or to ensure longevity.
Here are some general guidelines for applying glue to peel and stick tiles:
1. Prepare the surface: Ensure that the surface is clean, dry, and free from any dust or debris. This will help the glue adhere properly.
2. Choose the right adhesive: Select a high-quality adhesive that is recommended for the type of tile you are using. Follow the manufacturer's instructions and make sure it is suitable for the specific application.
3. Apply the adhesive: Apply a thin, even layer of adhesive to the back of the tile using a notched trowel or a specific recommended tool. Avoid applying too much adhesive as it can cause the tile to lift or create an uneven surface.
4. Press and smooth: Once the adhesive is applied, firmly press the tile onto the prepared surface. Use a roller or a clean, flat object to smooth out any air bubbles or wrinkles.
5. Allow proper drying time: Follow the adhesive manufacturer's instructions for drying time. It is essential to allow sufficient time for the adhesive to cure and bond with the surface.
Remember to always refer to the specific instructions provided by the tile manufacturer and adhesive manufacturer. If you are unsure about the process, it is recommended to seek professional advice or consult with an expert in the field.
Are there specific brands of glue recommended for peel and stick tiles?
When it comes to peel and stick tiles, it is generally not recommended to use additional glue. Peel and stick tiles are designed to adhere to the surface without the need for any extra adhesive. Using glue can interfere with the self-adhesive backing and may result in poor adhesion or damage to the tiles.
However, if you find that your peel and stick tiles are not sticking properly, there are a few steps you can take before considering using glue. First, ensure that the surface is clean, dry, and free from any dust or debris.
Additionally, applying some pressure to the tiles after installation can help improve adhesion.
If you have tried these steps and are still experiencing issues with the tiles sticking, it is best to consult the manufacturer's instructions or contact their customer support for guidance. They will be able to provide specific recommendations or suggest alternative solutions to ensure successful installation.
Can I remove peel and stick tiles without damaging the floor if I use glue?
If you have peel and stick tiles that are adhered with glue, removing them without damaging the floor can be a bit challenging. However, there are a few methods you can try to minimize the risk of damage.
Firstly, you can use a heat gun or hairdryer to warm up the tiles. This will soften the adhesive and make it easier to peel them off. Be sure to work in small sections and use a putty knife or scraper to gently lift the tiles while applying heat.
Another option is to use a commercial adhesive remover or a mixture of warm water and dish soap. Apply the solution to the tiles and let it sit for a few minutes to loosen the adhesive. Then, use a scraper to gently lift the tiles from the floor.
It is important to proceed with caution and test any method on a small, inconspicuous area first to ensure it doesn't damage the floor. Additionally, be prepared for some minor damage or residue left behind, which may require further cleaning or refinishing.
If you're unsure about the best approach for your specific flooring type, it's always a good idea to consult a professional.
Can I use a different type of adhesive if I can't find glue specifically for peel and stick tiles?
If you cannot find glue specifically designed for peel and stick tiles, it is not recommended to use a different type of adhesive. Peel and stick tiles are manufactured with a specific adhesive backing that is formulated to provide proper adhesion to various surfaces.
Using a different type of adhesive may not provide the same level of adhesion and could result in the tiles not sticking properly or coming loose over time.
If you are unable to find the appropriate adhesive for peel and stick tiles, it is suggested to consult with a professional or contact the manufacturer of the tiles for alternative solutions. They may be able to recommend a suitable adhesive or provide guidance on how to properly install the tiles without the specific glue.
It is important to follow the manufacturer's instructions and recommendations to ensure a successful installation and long-lasting results.
Can I use regular adhesive for peel and stick tiles?
No, it is not recommended to use regular adhesive for peel and stick tiles. Peel and stick tiles are designed to be self-adhesive, meaning they already have an adhesive backing that allows them to stick to the surface without the need for additional glue or adhesive.
Using regular adhesive may interfere with the adhesive backing of the peel and stick tiles and could potentially cause them to not adhere properly.
If you are experiencing issues with the adhesive on your peel and stick tiles, it is best to consult the manufacturer's instructions or contact their customer support for guidance. They may be able to provide you with specific recommendations or solutions to ensure the tiles adhere properly.
It is important to follow the manufacturer's instructions to achieve the best results and ensure the longevity of your peel and stick tile installation.
How long does the glue take to dry for peel and stick tiles?
The drying time for peel and stick tile glue can vary depending on several factors. On average, it takes around 24-48 hours for the adhesive to fully dry. However, it is important to follow the specific instructions provided by the manufacturer of the peel and stick tiles, as they may recommend a different drying time.
Factors such as temperature, humidity, and the surface where the tiles are being applied can also affect the drying time. In colder temperatures or high humidity, the drying time may be longer. It is important to ensure that the adhesive is completely dry before applying any pressure or walking on the tiles to avoid any damage or displacement.
To speed up the drying process, you can use fans or open windows to improve air circulation in the room. Additionally, avoid applying excessive adhesive as it may take longer to dry. If you are unsure about the drying time or have specific concerns, it is always recommended to reach out to the manufacturer or consult a professional for guidance.
Is glue necessary for peel and stick tiles, or can they be installed without it?
Peel and stick tiles are designed to be self-adhesive, which means that in most cases, glue is not necessary for their installation. The adhesive backing on these tiles is typically strong enough to securely stick to the surface they are applied to.
However, it is essential to ensure that the surface is clean, smooth, and free from any dust or debris before installing the peel and stick tiles. This will help to maximize the adhesive's effectiveness and ensure a long-lasting bond.
In some instances, if the surface is not ideal for adhesion, or if you want to add an extra layer of security, you can use additional adhesive, such as a pressure-sensitive adhesive or a double-sided carpet tape.
However, it is important to follow the manufacturer's instructions and recommendations when using additional adhesives, as some may not be suitable for peel and stick tiles and could potentially damage them.
Ultimately, it is best to consult the specific installation instructions provided by the manufacturer of the peel and stick tiles you are using, as they will provide the most accurate guidance for a successful installation.
What is the best type of glue for peel and stick tiles?
When it comes to peel and stick tiles, the best type of glue to use is actually the adhesive backing that is already applied to the tiles. Peel and stick tiles are specifically designed to be self-adhesive, eliminating the need for additional glue or adhesive.
The adhesive backing on these tiles is usually strong enough to securely stick to various surfaces, such as walls or floors.
Using additional glue or adhesive may not only be unnecessary, but it can also potentially interfere with the proper installation and adhesion of peel and stick tiles. It may cause the tiles to not lay flat or adhere properly, resulting in a less durable and visually appealing finish.
If you are experiencing issues with the adhesive backing on your peel and stick tiles, it is best to contact the manufacturer for guidance or consider replacing the tiles altogether.
What should I consider when choosing a glue for peel and stick tiles?
When choosing a glue for peel and stick tiles, there are several factors to consider to ensure a successful installation. Firstly, it is important to check the manufacturer's recommendations and instructions for the specific type of peel and stick tiles you are using.
Some tiles come with their own adhesive backing, eliminating the need for additional glue.
If you do need to use glue, consider the type of surface you will be installing the tiles on. Different glues are designed for different surfaces such as concrete, wood, or vinyl. Make sure the glue you choose is compatible with the surface to ensure proper adhesion.
Additionally, consider the strength and durability of the glue. Look for a glue that is specifically designed for flooring applications and offers strong bonding properties. This will help ensure that the tiles stay firmly in place and prevent any lifting or shifting over time.
Lastly, consider the drying time and ease of application of the glue. Some glues require longer drying times, which may prolong the installation process. Choose a glue that is easy to apply and dries within a reasonable time frame for your needs.
If you are unsure about which glue to choose, it is always a good idea to consult with a professional or the tile manufacturer for their recommendations based on your specific project.